Shamrocks have become a symbol of St. Patrick’s Day, and what better way to celebrate than by creating your own shamrock paper crafts? These crafts are not only fun to make, but they also provide a great opportunity for people of all ages to express their creativity. Whether you are looking to decorate your home or office space, or just looking for a fun activity to do with your family, shamrock paper crafts are an excellent choice.
Shamrock paper crafts have a rich history that dates back to ancient Ireland. The three leaves of the shamrock were said to represent the Holy Trinity, and it was believed that wearing a shamrock would bring good luck. Today, shamrock paper crafts are a popular way to celebrate St. Patrick’s Day and bring a little bit of luck into your life.
History of the Shamrock
The shamrock, also known as the “seamróg” in Irish, is a three-leafed plant that is widely recognized as a symbol of Ireland. The word “shamrock” comes from the Irish word “seamróg,” which means “little clover.” The plant has been an important part of Irish folklore and culture for centuries.
One of the most famous legends surrounding the shamrock is that it was used by Saint Patrick, the patron saint of Ireland, to explain the concept of the Holy Trinity to the Irish people. According to the legend, Saint Patrick picked a shamrock from the ground and used its three leaves to represent the Father, the Son, and the Holy Spirit.
The shamrock has also been used as a symbol of luck in Irish culture. According to legend, finding a four-leaf clover, which is a rare variation of the shamrock, is said to bring good luck to the finder. Each of the four leaves of a four-leaf clover is said to represent something different: faith, hope, love, and luck.
In modern times, the shamrock has become an important symbol of Irish identity and pride. It is often used to represent Ireland and Irish culture, and is a popular motif in Irish art and design. The shamrock is also the official flower of Ireland, and is used as a decorative element in many Irish celebrations, including St. Patrick’s Day.
Why Shamrock Paper Crafts?
Shamrock paper crafts are a fun and creative way to celebrate St. Patrick’s Day or add some Irish flair to everyday decor. These crafts are easy to make with simple materials like paper, scissors, and glue, making them accessible to crafters of all skill levels.
One of the benefits of shamrock paper crafts is their versatility. They can be used to create a wide range of decorations, including wreaths, garlands, and even table centerpieces. Additionally, they can be made in a variety of sizes and colors to fit any theme or occasion.
Another advantage of shamrock paper crafts is their affordability. Unlike many other types of crafts, they require only a few basic materials that are readily available at craft stores or online. This makes them an excellent choice for those on a budget or looking for a fun and low-cost activity to do with kids.
Shamrock paper crafts also provide an opportunity to exercise creativity and develop fine motor skills. Cutting and folding paper requires precision and attention to detail, making it a great activity for improving hand-eye coordination and dexterity.
Overall, shamrock paper crafts are a fun and accessible way to celebrate Irish culture and add some festive flair to any space. With their versatility, affordability, and creative potential, they are an excellent choice for crafters of all ages and skill levels.
Materials Needed for Shamrock Paper Crafts
To make Shamrock Paper Crafts, there are some basic materials that are required, as well as some optional materials that can be used to enhance the craft. Here are the materials that are needed:
Basic Materials
- Scrapbook Paper: 12 x 12 inch works best
- Paper cutter
- Scissors
- Adhesive: either glue dots or tape runner or both
- Twine or ribbon to hang the shamrocks
These basic materials are essential to make Shamrock Paper Crafts. The scrapbook paper can be of various colors, depending on the preference of the crafter. The paper cutter is used to cut the paper into strips of the required length and width. Scissors are used to cut out the shamrock shapes. Adhesive is used to stick the paper strips together to form the shamrock shape. Twine or ribbon is used to hang the shamrocks.
Optional Materials
- Double-sided paper
- Extra scraps of paper for center decoration and back pieces
- Hot glue
- Shamrock template
- Colored paper (rainbow colors)
Double-sided paper is optional but looks best for Shamrock Paper Crafts. Extra scraps of paper can be used for center decoration and back pieces. Hot glue can be used to attach the shamrocks to the ribbon or twine. A shamrock template can be used to trace the shamrock shape onto the paper, making it easier to cut. Colored paper in rainbow colors can be used to make the shamrocks more colorful and vibrant.
Overall, these materials are easy to find and are affordable, making Shamrock Paper Crafts a fun and accessible craft for all ages.
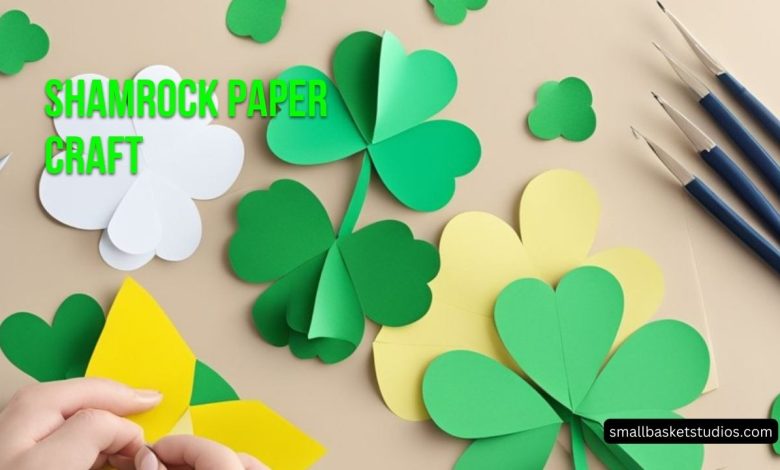
Step by Step Guide to Creating a Shamrock Paper Craft
Preparation
Before beginning the crafting process, gather all the necessary materials. The materials required for this craft include green construction paper, a pencil, scissors, and glue. Additional materials such as glitter or sequins can be used to decorate the shamrock.
Crafting Process
- Cut the green construction paper into four strips of equal length and width.
- Fold each strip in half lengthwise, creasing it firmly.
- Fold each strip in half lengthwise again, creasing it firmly.
- Unfold the strips and fold each end towards the center crease, creating a heart shape.
- Glue the ends of each strip together, forming a heart.
- Take two of the hearts and glue them together at the bottom point.
- Repeat step 6 with the remaining two hearts.
- Glue the two pairs of hearts together at the bottom points, creating a shamrock shape.
- Cut a stem out of the remaining green construction paper and attach it to the bottom of the shamrock.
Final Touches
After completing the crafting process, add any final touches desired. This could include adding glitter or sequins to the shamrock, or attaching a string to hang the craft. The finished product is a beautiful and festive shamrock paper craft that can be displayed for St. Patrick’s Day or any other occasion.
Advanced Shamrock Paper Craft Techniques
For those who have mastered the basics of shamrock paper crafts, there are some advanced techniques that can take your creations to the next level. Here are two techniques that can add complexity and depth to your shamrock designs.
Layering Technique
One way to add depth and dimension to your shamrock paper crafts is through layering. To use this technique, create multiple shamrock shapes in varying sizes and colors. Then, stack the shapes on top of each other, using glue or tape to secure them in place.
To make the layers stand out even more, consider using foam tape or dots between each layer. This will create a raised effect that adds visual interest to your design.
3D Shamrock Technique
Another advanced technique for shamrock paper crafts is creating a 3D effect. To do this, fold multiple shamrock shapes in half down the center and glue them together at the folds. This will create a 3D shamrock that can be used as a decoration or even a gift box.
To make the 3D effect even more pronounced, consider using different shades of green or adding glitter or other embellishments to each layer.
With these advanced techniques, you can take your shamrock paper crafts to the next level and create truly stunning designs.
Safety Tips while Crafting
Crafting with paper can be a fun and engaging activity, but it is important to keep some safety tips in mind to avoid any accidents. Here are some tips to follow when crafting with paper:
- Use safe materials: Always choose non-toxic materials when crafting with paper. Make sure to read the labels of the materials before using them to ensure that they are safe to use.
- Use proper tools: Use scissors, paper cutters, and other tools with caution. Make sure to use them properly and keep them out of reach of children.
- Supervise children: Always supervise children when they are crafting with paper. Make sure that they are using the materials and tools properly and safely.
- Wash hands after crafting: After crafting, wash hands thoroughly to remove any glue or other materials that may be on the hands.
- Clean up properly: Make sure to clean up all materials and tools after crafting to avoid any accidents. Store materials and tools in a safe place out of reach of children.
By following these safety tips, you can enjoy crafting with paper while keeping yourself and others safe.
How to Preserve Your Shamrock Paper Craft
After creating your beautiful shamrock paper craft, you will want to ensure that it lasts for a long time. Here are some tips on how to preserve your shamrock paper craft:
1. Display it Properly
To keep your shamrock paper craft in good condition, you should display it in a dry and cool place. Direct sunlight or heat can cause the paper to fade or curl, so it’s best to keep it away from windows or radiators.
2. Use a Protective Coating
If you want to add extra protection to your shamrock paper craft, you can use a protective coating. There are various types of coatings available, such as clear spray sealants or decoupage glue. These coatings will help to keep the paper from deteriorating and can also add a glossy finish to your craft.
3. Store it Properly
If you need to store your shamrock paper craft, make sure to keep it in a dry and dust-free environment. You can store it in a clear plastic bag or a box with acid-free tissue paper to protect it from dust and moisture.
4. Handle it with Care
When handling your shamrock paper craft, make sure to do so with clean and dry hands. Oils and moisture from your hands can cause the paper to deteriorate over time. Also, avoid touching the craft too much as it can cause the paper to become worn or creased.
By following these tips, you can ensure that your shamrock paper craft will remain in good condition for years to come.
Conclusion
Making a Shamrock Paper Craft is a fun and easy activity that can be enjoyed by people of all ages. With just a few simple supplies such as paper, scissors, and glue, anyone can create a beautiful shamrock that can be used as a decoration for St. Patrick’s Day or any other occasion.
There are many different ways to make a shamrock paper craft, as demonstrated by the various search results. Some methods involve cutting out heart shapes and gluing them together, while others involve folding the paper in a specific way to create the shamrock shape.
Regardless of the method chosen, it is important to take the time to carefully follow the instructions and pay attention to the details. This will ensure that the finished product looks neat and professional.
Frequently Asked Questions
What are some easy Shamrock paper craft ideas?
There are many easy Shamrock paper craft ideas that are perfect for beginners. Some popular ideas include making paper shamrock wreaths, shamrock garlands, and shamrock cards. Another easy idea is to make 3D shamrocks using paper strips. These crafts can be made using basic materials like construction paper, scissors, and glue.
Where can I find free printable Shamrock paper craft templates?
There are many websites that offer free printable Shamrock paper craft templates. Some popular websites include Craftow, Little Bins for Little Hands, and Messy Little Monster. These websites offer a variety of templates that can be printed and used for different Shamrock paper craft projects.
What are some popular Shamrock paper craft patterns?
Some popular Shamrock paper craft patterns include the traditional three-leaf clover design, as well as more complex designs like four-leaf clovers and intricate Celtic knot patterns. These patterns can be used to create a variety of Shamrock paper crafts, from simple cards and garlands to more complex wreaths and decorations.
How can I make 3D Shamrocks?
To make 3D Shamrocks, you will need paper strips in different colors, scissors, and glue. First, fold each paper strip in half to create a crease. Then, fold the strip in half again, this time in the opposite direction. Next, glue the two ends of the strip together to create a heart shape. Repeat this process with several strips of paper in different colors. Finally, glue the hearts together to create a 3D Shamrock shape.
What materials do I need to make a Shamrock paper craft?
The materials needed to make a Shamrock paper craft will depend on the specific project. However, some basic materials that are commonly used include construction paper, scissors, glue, and markers or crayons for decoration. Additional materials like glitter, stickers, and ribbon can also be used to add extra flair to your Shamrock paper craft.
What is the process for making a Shamrock paper craft garland?
To make a Shamrock paper craft garland, you will need green construction paper, scissors, glue, and string or ribbon. First, cut out several Shamrock shapes from the green construction paper. Next, glue the Shamrocks onto the string or ribbon, leaving a small gap between each one. Once all of the Shamrocks are attached, hang the garland up and enjoy your festive decoration.